Friday 25 February 2011

Sweet Simplicity

Lately I've been doing alot of projects where I use lots of colours to colour a stamped image, and a fair bit of papers for backgrounds and things, but yesterday I had the urge to just simplify everything.

To make this card I literally used about one and a half sheets of A4 plain white cardstock, 2 Distress Inks (Dusty Concord and Forest Moss), 2 floral stamps, the sentiment stamp with black Staz-On, and a strip of plain white satin ribbon.

I think when you keep all the 'ingredients' simple and white, it allows for more creativity.


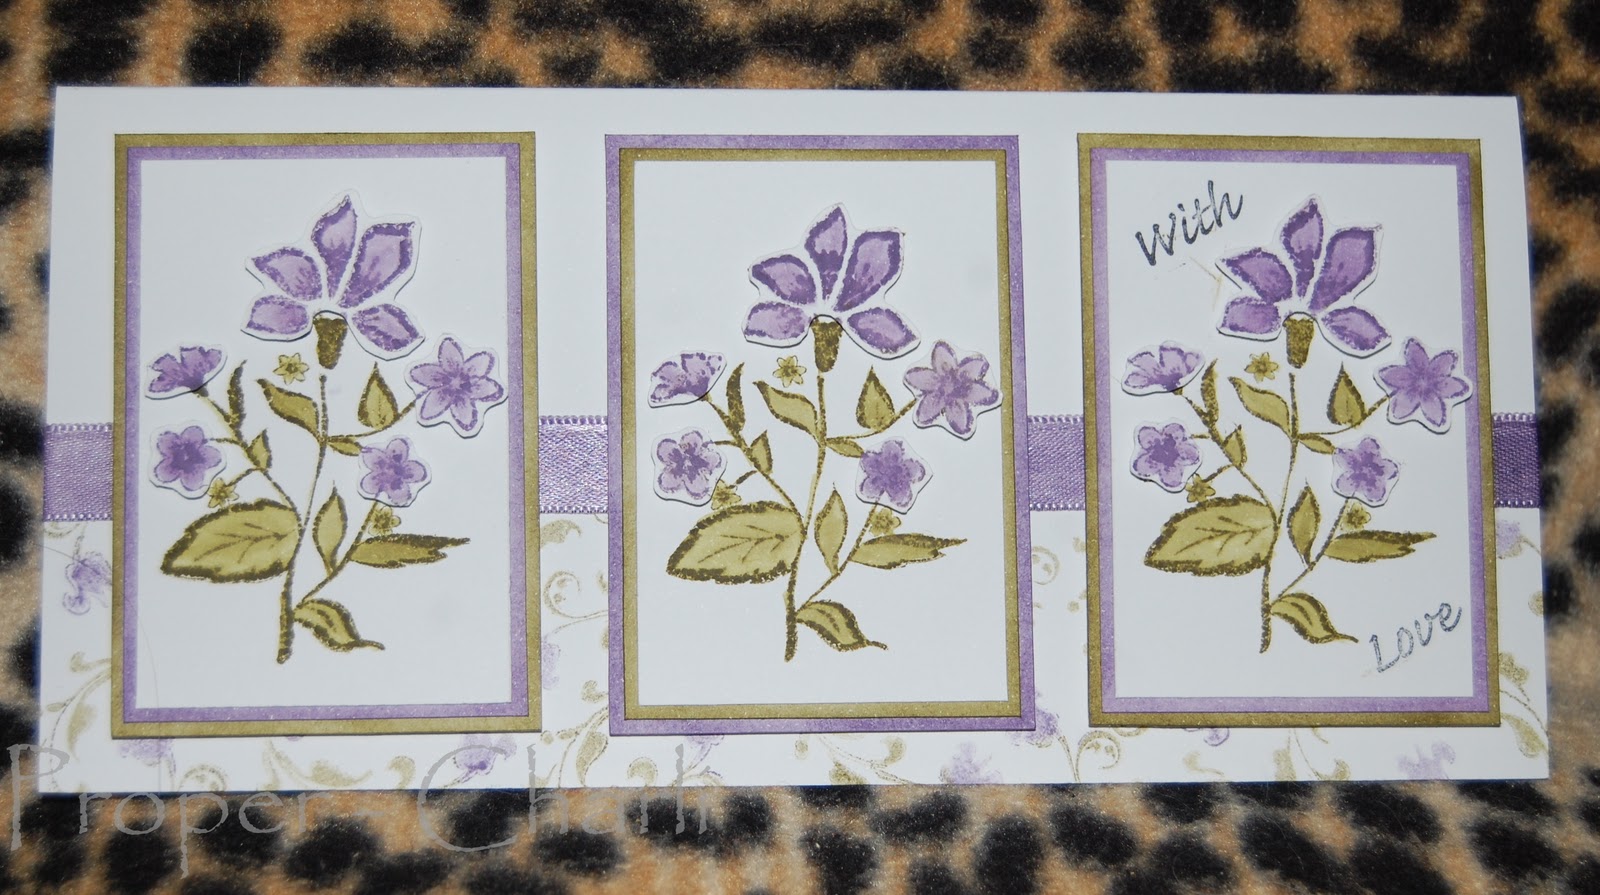
Firstly, I scored, folded and trimmed a sheet of card down to standard DL size. Then measured the stamp I wanted to use and found that it would fit a 2x3" panel perfectly. I cut 3 panels to follow the sketch over at Cards and Things.


I stamped the image onto each panel using Forest Moss, then used a wet paintbrush and smidge more ink to colour in the leaves.


The flowers themselves were stamped onto other card in Dusty Concord (I love how those two colours give a vintage feel without being really girly), using the same method to fill in the blooms. Once they were dry I cut them out roughly and layered them onto foam pads.


I cut 3 panels slightly bigger, and three more a little bit bigger still, then inked them with the Distress Inks, alternating the colours of the panels; then layered them up.


I drew a line across the base where I wanted the ribbon to be and masked off the top portion with sticky notes. I chose a small flower stamp that was easy to ink by pressing the flowerhead onto the purple and the stem onto the green, then blotted it on scrap paper each time before stamping onto the card.


I coloured the white ribbon with the Dusty Concord and stuck it down with DST as wet glue would've made the colour run.


Finally I added the sentiment in black to the right hand panel, and added all three on foam pads.


Incidently the theme at Lexi's Creations is 'flowers' so I'm entering it there too.


Wishing you all a great weekend; we're off for a family gathering so should be good fun!


Take care and happy crafting,
Charli x

Tuesday 22 February 2011

Alice Artwork

....well, if you can call my attempt art that is!


The Altered Alice is asking for either a dress form, or a change in form for young Alice, and this is a scene that features my second favourite change in form (or size) of our poor heroine; my actual fave is when she grows too large inside the White Rabbit's house and her arms and legs poke out the windows and doors, but I couldn't draw that at all!

Anyway, this is when Alice drinks the 'Drink Me' potion to fit through the door, leaving the key atop the table.

I haven't done any sketching or painting for a very long time, so I'm quite pleased with this, just so long as you don't look at it too closely - its definitely work to be observed from afar lol!!!


Sketched onto watercolour paper then washed and painted with a combination of Distress Inks and watercolour pencils.


I am also entering this into Raise the Bar's cartoon character challenge. I hope this counts as I know Alice is really a character from literature, but this is based off of the Disney animated film (having never readthe actual book!)


Take care and happy crafting,


Charli x

By Royal Appointment

Once again I was in the mood for getting my hands all covered in ink this morning; I suppose I need to make the most of it while its half term and I don't have work to go to!
I managed another three-for-one, well I suppose technically its a three-for-three lol; I haven't made an ATC for so long that I just couldn't stop at one!!

So this little set of three Royal ATCs are entered into:

Sunday Stampers 'numbers'
and The Crafty Pad 'red, pink and black'


 The ATC bases and the inchies on the first one were cut from an old cereal box. All were created with plenty of stamping, masking and inking (coloured with Victorian Velvet, Worn Lipstick and Barn Door Distress Inks). A couple of bits cut from some old playing cards, crowns stamped and cut from white card and some'coins' punched from silver mirri coloured with black ink.
You can't see it but the crowns on the inchies and the ones from white cardstock are highlighted with a Sakura glaze pen.
Incidently, all 3 ATCs are available if anyone wishes to do a trade, either the whole set or individually. Just leave me a comment here and/or click the link at the top of my blog to email me.
Charli x


PS. The stamped stripes were done with another background stamp I made myself with some strips of craft foam and a lid from a small cigar tin. Here is a little pic of it and the harlequin design I made a while back and used on my tag here.

Saturday 19 February 2011

A Three-For-One

This morning I decided to spend some time getting all inky and messy, with some inspiration from a couple of challenges.

First, Play Date Cafe has red, green and black as their colour scheme.
Second, Simon Says Stamp and Show are asking to see a tag.
And lastly CRAFT Challenge want 'not a card', which a tag isn't; so here we are:

Barn Door DI was blended around a manilla tag and edged with Walnut Stain.

I stamped the keys around the edges using black Staz-On and made a couple of masks from sticky notes. Using the masks I stamped over the keys with the script background and Tim's ticket block.

I added the  harlequin backgroud (that I made myself from craft foam glued onto a block) with Barn Door.

The letters were stamped onto inchies and then inked with Forest Moss, edged in Walnut Stain, then I used a wet paintbrush to lift the colour from inside the letters for a bleached effect. The centre one is glued down flat and the others are on foam pads.

The bird, from a Seven Gypsies set, was stamped using Walnut Stain DI and then the colour was blended out using a wet brush. He was cut out and attached with foampads.

The puzzle piece was inked with Forest Moss DI and a crown (from the same set as the bird) was stamped in Staz-On and coloured with green watercolour pencil.

The tartan ribbon adds a finishing touch and ties the colours together.

Take care and happy crafting,
Charli x

Another Great Sketch

The challenge over at Sweet Pea Stampers is a beautiful sketch by DT member Vanessa.

This paper is absolutely lovely, fab colours, and is a sheet from a book of free paper from an old craft mag (wish I knew where I could get more). I cut a square down into the blocks on the sketch and adhered them to a square of silver mirror card.

The image is yet another gorgeous ching-chou kuik meraid, stamped with black Staz-On and coloured with Distress Inks (Weathered Wood, Victorian Velvet, Antique Linen, Tea Dye, Walnut Stain and Forest Moss) using a waterbrush. I cut around it using a pair of decorative edged scissors, layered onto more silver mirror card and mounted onto foam pads.

The flowers were punched and ribbled until the layers peeled apart and were coloured with Weathered Wood and Victorian Velvet DI (which match the paper superbly).

The finishing touch is the text, a quote from Hans Christian Andersen that was included on the ching-chou kuik stamp plate.

Charli x

Friday 18 February 2011

New and Neglected Stash

The best thing about the challenges over at Sketch n Stash is not just the fabulous sketches to inspire you, but the nudge in the right direction to use new and/or neglected stash. And this week I've used both.

For this weeks sketch click HERE

The 'new' element from my stash is another beautiful ching-chou kuik image, stamped in black Staz-On and coloured with watercolour pencils.
The paper is from the Dovecraft Fantasy pack, which I've had for nearly a year and have used only twice (and never this actual paper either),and the border punch (from Woodware) has been sat collecting dust for goodness knows how long.

A lovely simple sketch design that results in a beautifully simple elegant card, may have to use this sketch again in the future!

Charli x

Thursday 17 February 2011

A Winged One

I made this card using one of my gorgeous new Ching-Chou Kuik stamps, and as luck would have it it's suitable for entry into a couple of challenges.

Firstly over at Crafts and Me the theme is Time To Spread Your Wings, meaning anything with wings, which this gorge mermaid-fairy definitely has.


Also the requirement over at Fab'n'Funky Challenges is to make your own embellishment/s, which I have done with my distressed paper flowers.

The flowers were punched from ordinary white cardstock, and run through my paper ribbler/crimper/thingamajig in all directions until the layers peeled apart, then coloured with Distress Inks (Dusty Concorde and Milled Lavender). The centres were doodled on with a gel pen.

As for the rest of the card, it was a white square base card and I cut the front off then folded it in half so that the image could stand above it and it would still fit in the same envelope. I used some temporary adhesive to attach some star-shaped sequins to the bottom corner to act as masks, and inked the whole card with Milled Lavender DI and edged it in Dusty Concorde. I stamped the script background in black Staz-On.

The image was stamped in Staz-On and coloured with watercolour pencils. I trimmed her down and rounded the top corners before layering onto purple holigraphic card. It's attached to the base with foam pads and the flowers were added with mini glue-dots to allow the petals to maintain dimention. The finishing touch is the 'Do you believe' stamp that came on the same plate as the image.

Wednesday 16 February 2011

Gulp - My First Ever WOYWW!

Yes, I know.... I must be one of the only crafty-bloggers out there who have never joined in with What's On Your Workdesk Wednesday! But now that I am back with prope internet access (hooray for broadband!) I decided it was time to take the plunge and take a picture of my desk.

 And here it is:
(Only just managed to refrain myself from adding a 'tah-dah' lol)

It's not huge but it's all mine; and for once it's actually tidy! Only due to a bit of rearranging over the weeknd; well I had no choice, my old computer monitor stopped working and this shiny new one is a fair bit bigger so I had to clear extra space!

Not alot going on there at the moment, been too busy trying to catch up on all the blogs I've missed while withot internet! But I have recently purchased Joanna Sheen's Lofty stamp 'Lick of Paint' as it's going to be perfect for my F-I-L's Father's Day card (planning ahead -oooh, get me) so I've had a little play; I find his expression adorable.

And in honour of this being my first WOYWW, I thought I would just share a pic of my corner - otherwise christened my 'crafty nook'.
We live in a small cosy 2bed terraced house so I'm not lucky enough to have a whole room, well not 'til my daughter moves out in 10+ years!

But this is my nook, in the corner of our lounge, you know in that awkward gap under the stairs that has no real use! But I love it. The desk itself is very special as it was built by my hubby when he was back in school as a woodwork project and it is so sturdy I love it.

The hutch above it was also made by my hubby specificly for this purpose. (Just pretend you can't see the mess on the top shelf lol, I didn't get that far yet with the tidyup!!)

There are drawers and things below the desk as well as on the other side of my computer base. And the CD rack on top of it holds CD cases storing my unmounted and clear stamps - and it's waiting to be attached to the wall so that it won't stay at that precarious angle!

And beside me on the wall is my big notice board, holding my To Do list for the month, other bits and bobs, and of course artwork by my nearly-8-year-old!

Thanks for stopping by, and I will make an effort to visit as many desks as I can this afternoon/evening.

Take care and happy crafting,
Charli x